Blum Hinge Adjustment
To Remove the Door
No tools needed!
Please make sure to continually support the door as you do this. FAILURE TO DO SO MAY RESULT IN DAMAGE TO YOUR DOOR OR INJURY TO YOURSELF! If necessary, get yourself a helper. With that said, let’s begin.
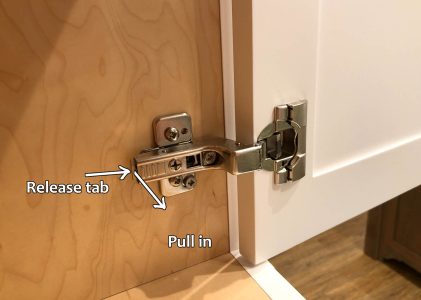
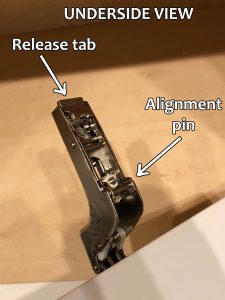
Open the door you wish to remove, and locate the Release tab on each hinge.
As the photo indicates (click or tap to see bigger) and while maintaining a firm grip on the door, simply pull the tab in towards the opposite side of the cabinet. This will immediately release the hinge lever from the base plate.
Do the same for the second hinge. Again, make sure you or your helper have a firm grip on the door.
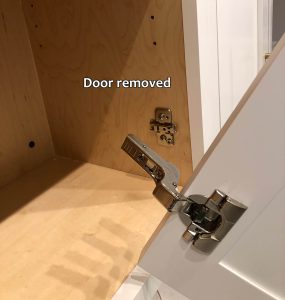
With both tabs now released, the door is free to be CAREFULLY removed from the opening. The second photo shows the hinge removed from the base plate.
To Reinstall the Door
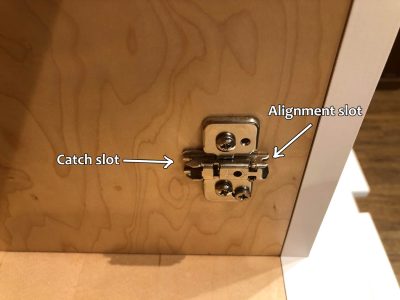
First, let’s look at the attachment points. On the base plate (Image 1), there are two: The Alignment Slot and the Catch Tab. The Alignment Slot is where to fit the Alignment Pin (shown in Image 2) and that’s the primary spot to align first. Then pressure is applied to the end of the hinge lever to click the hinge into place.
Let’s begin:
With both hinge levers fully open (if the hinge lever is at 90 degrees to the door, that would be closed), carefully ease door into the opening, aiming to place the Alignment Pin into the Alignment Slot on one hinge. It doesn’t matter which hinge, whichever one is more convenient to get to first. (It helps if you keep the door itself somewhere near 90 degrees to the cabinet face.) Slide the pin into the slot, and make sure it is in all the way. (There won’t be a click)
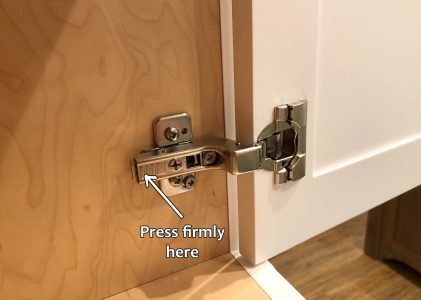
Now that the Alignment Pin is seated, press firmly on the end of the hinge lever, as indicated in Image 3. You will feel it click into place. If you don’t feel or hear a solid click, that hinge is not secured. Once you have correctly secured the hinge lever, move on to the second hinge and repeat the procedure.
Both hinges clicked into place? Great job, you’re done!

Crown Select Cabinetry
462 River Road
Claremont, NH 03743
